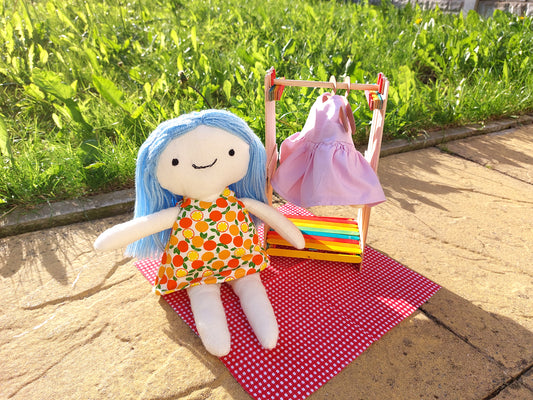
Hey Podgekins Pals! I’m Lucy (@LucyCraftsIt) and I’m here as a guest on the Podgekins blog to tell you all about the fun accessory I made for my own Podgekins dolly! In this blog post I show how to make a little miniature wardrobe for the Podgekins dolly dresses
I had so much fun sewing my first Podgekins dolly and it really sparked my imagination, I felt like I was little again and I had all these dreams of different accessories I would love to have for my dolly to play with. As I was sewing my dolly’s second dress, I started to wonder if there was a cute and fun way I could store and display all my lovely makes. Queue Pinterest research!! I found this amazing popsicle stick wardrobe which is the perfect size for your Podgekin outfits and now you can make one too.
What you will need:
● Popsicle sticks (about 80x)
● 1x wooden dowel
● Tacky glue
● Ruler
● Pencil
● Scissors or craft knife
Step 1:
Using a ruler, line up 8 popsicle sticks, draw a line along the bottom and cut your popsicle sticks so that the bottom edge is flat.


Step 2:
Cut 2 popsicle sticks to match the width of 8 popsicle sticks, glue one at the top (round edges), roughly ¼ inch away from the edge. Glue the second popsicle stick close to the bottom (straight edges), making sure to leave room at the bottom for half a popsicle stick (we’ll use this when joining pieces together).
These are your side panels, repeat these steps until you have 4 panels.

Step 3:
For each side, join 2 side panels by placing the 2 straight edges together and glueing an extra popsicle stick in the middle.
To add extra strength, you can turn the panels over and add 3 more popsicle sticks where the two pieces join. You should now have 2 long side panels.
Step 4:
Add 5 more popsicle sticks to the top and bottom of your two side panels. Cut each popsicle stick to fit the width of 8 popsicle sticks, keep the ends for the next step. To add a bit of colour you can use rainbow popsicle sticks like me or paint them any colour you like.


Step 5:
Using the end pieces you saved, glue together 3 end pieces, do this 4 times and then add these to stick 4 and 5 at the top of each of your long side panels, leaving enough room for your dowel to fit in the middle.

Step 6:
Create the base of the wardrobe by lining up 8 popsicle sticks, you can support these by glueing another stick across the middle. attach this to the bottom of each of your side panels.


Your wardrobe should now look a little something like this.
Step 7:
Add glue to each end of your dowel and attach it to the top of each side panel.


Finishing touches:
Congratulations, your dolly wardrobe is now ready to hang all your beautiful Podgekin clothes.
Now is a good time to sand any sharp edges to avoid splintering any little fingers. You can also add decorations or paint the sides to add your own touch.


Hangers:
To make the wardrobe functional I cut out hangers from heavy cardstock using my Cricut machine, you can find the project here.
If you don’t have a digital cutting machine you can always cut out some hanger shapes yourself, or make some from pipe cleaners. (Pinterest is your friend here!)
The best part about making accessories for your Podgekin is letting your imagination run free and add all those extra touches of personality to make yours or your little one’s role playing come to life.
Wishing you all the best of luck on your Podgekins adventures!
Lucy x


